How to Upgrade a Fireplace Surround with Designer Details

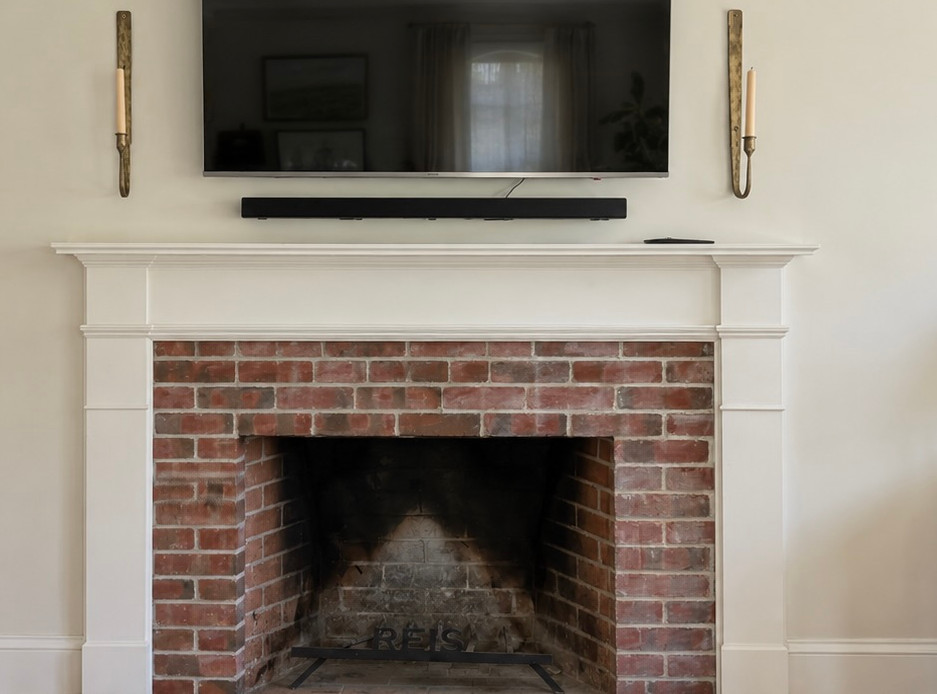
Some brick has soul. It feels aged, handmade, imperfect in the best way. This fireplace was not that brick.
As an interior designer, I love original & natural materials when they add warmth and character to a room. But in this case, the brick was working against the space. It felt heavy, visually busy, and disconnected from the softer cream walls around it and the more contemporary style of our furnishings. I tried limewashing first, hoping it would calm everything down while still letting the texture show through. It helped a little, but it never felt quite right.
The solution was a fireplace facade upgrade using warm, textured tile, careful prep, and a few tailored details that made the whole surround feel custom instead of simply covered up.
Oh, and I would be remiss not to mention a HUGE additional upgrade that really made this focal point of the room shine: our new Samsung Frame TV.
Why the original brick was not working
The first question I ask before changing a permanent surface is simple: does this material support the room?
Brick can be beautiful, especially when it has age, variation, and charm. In older homes, I often prefer to preserve it. But this brick did not have that collected, historic feeling. The color was too strong, the texture felt flat, and the pattern pulled attention away from the rest of the room.
That is why limewash felt like the right first step. It is a softer, more forgiving option than paint, and it can be a wonderful way to tone down red or orange brick. But here, even after limewashing, the proportions and surface still felt distracting.
That was the moment I knew the fireplace needed a cleaner direction.
My goal was not to erase all character. I wanted to quiet the brick and replace it with something that felt intentional, warm, and layered.
Designer tip: Before choosing a new material, decide what role the fireplace should play. It can be the focal point, or it can be a quiet architectural feature. This one needed presence without shouting.
Choosing tile that feels warm, not sterile
The tile selection mattered more than anything else in this project.
Because the walls were already a soft cream, I knew I wanted the fireplace to blend with them rather than create a high-contrast moment. But a cream tile can easily fall flat if it is too perfect. A fireplace needs depth, especially when it sits in a main living area.
I looked for tile with three specific qualities:
A warm cream tone
Not stark white, not gray, and not yellow. The shade needed to complement the cream wall color and feel soft in natural light.
Texture on the surface & high-gloss finish
A slight handmade or uneven finish keeps the tile from looking sterile and the high-gloss made added interest,
Variation from tile to tile
The subtle color shifts were intentional. Those differences help the finished wall feel collected and organic instead of overly uniform.
This is where small details make a big impact. When every tile is exactly the same, the fireplace can start to feel like a flat sheet. With gentle variation, the eye moves across the surface in a much more natural way. Here is the tile we used.

The prep work that made the tile shine
Before the tile could go up, the firebox needed attention.
This step is not glamorous, but it is one of the most important parts of the process. If the inside of the fireplace looks unfinished or visually busy, it can distract from even the most beautiful tile installation.
I cleaned and prepped the firebox first. Then I painted it with a heat-resistant paint made for high-temperature areas. The goal was to make the existing brick inside the firebox recede visually, so the new tile could become the main design feature.
A dark, clean firebox creates contrast in a quiet way. It frames the opening, hides old discoloration, and gives the fireplace a finished look.
If you are doing this in your own home, make sure the paint is rated for the exact use and temperature exposure. Always follow the product instructions, and if the fireplace is active, check with a qualified professional before making changes near heat, gas lines, or venting.
For the tile installation, we hired Kyle Higley's Tiles. A herringbone pattern requires precision, especially around a fireplace where the eye naturally lands. The layout, cuts, and alignment all matter.
Herringbone was the right choice here because it added movement without adding more color. It gave the fireplace that extra designer layer while keeping the palette calm.

Designer details that make the finished fireplace feel custom
The biggest upgrade detail was the edge treatment.
Instead of stopping the tile with a basic trim piece, we wrapped the corners with a mitered edge. This means the tile turns the corner cleanly, creating a seamless look from the front face to the sides. I don't want to downplay the execution, it takes a skilled installer, but it came together beautifully.
That one decision made the fireplace feel much more custom and elevated.
A mitered edge is a detail you may not notice right away, but you feel it. It removes visual clutter. It keeps the shape crisp. It makes the fireplace look designed from every angle, not just straight on.
These are the kinds of details I think about on every project:
A standard edge can feel more casual and practical.
A flat tile layout can work well in simple spaces.
A bright white tile can feel crisp.
A mitered edge feels cleaner, quieter, and more tailored.
Herringbone adds movement while staying classic.
A warm cream tile feels softer and more integrated.
None of these choices need to be loud. In fact, the best details often are not loud at all. They simply make the finished space feel resolved.
The finished fireplace feels softer and more intentional
The finished fireplace completely changed the feeling of the room.
The old brick used to compete with the walls, furniture, and styling. Now the fireplace sits beautifully within the palette. The warm tile complements the cream walls rather than matching them exactly, which keeps the room from feeling one-note. Here is the fireplace screen we have.
The texture gives the surround enough interest up close, while the herringbone pattern adds structure from a distance. The painted firebox recedes, just as intended. The mitered corners bring in that custom, luxury feeling without making the design feel fussy.

If you are planning a similar project, my best advice is to slow down during the selection phase. Bring tile samples into the room. Look at them in morning light, afternoon light, and evening light. Compare them directly against the wall color. Pay attention to undertones, texture, and variation.
A fireplace is a permanent visual anchor. The right material should feel like it belongs to the room, not like it was added as an afterthought.
There is so much more to explore in this room but for this project, covering the brick was the right call. The tile brought warmth, softness, and refinement, while the herringbone layout and mitered edges gave the fireplace the custom detail it needed. The result feels calm, elevated, and much more in line with the home.


Comments